I also can't wait for this next class! Tami Beaton is back to show us how to stretch our stamps with a fun set of stamps and die cuts from Hero Arts. Tami always has such great ideas and tips to share. You will love what she has to show you during this class!
Here's a quick look at the cards we will be making:

Stretch Your Stamps Class
Date: Saturday, Sept. 29th
Times: 10:00 AM & 1:00 PM
Cost: $12.50
Bring: paper trimmer, scissors, adhesive and pop dots
Call 721-7529 or email scrapandplay@rushmore.com to reserve your spot.
Ink blending tools
Some of you have seen what I have been using with my ink blending foam when I "smoosh" my Distress Inks. It's a little crude, but they are lightweight and easy to handle, and inexpensive enough that I can have one for each color of Distress Ink I own.
Here, take a look:


This material is a very dense foam with an adhesive backing to it. It comes in a 8"x10" sheet, like this.

I am able to get 30 1 1/4" x 1 3/4" blocks from one sheet. You will still need to purchase some Velcro Hook that is at least 1" wide, and you will need about 4 feet of it to do all 30 blocks. I found mine at Walmart in the sewing section. So far all of the Velcro I've found has an adhesive backing on it, but I don't think it is necessary because the foam has a very sturdy adhesive on it already. You will also need enough blending foams for the blocks.
Here's how I do it:

My metal ruler just happens to be 1 1/4" wide, so I hold that down and use a box cutter to cut the foam along the edge of the ruler. I make two passes down the 10" length of the foam. One goes about half way through and the other goes almost all the way through. (I cut with the adhesive side down) You will still need to cut through the adhesive backing. If you don't have a ruler that is 1 1/4" wide, then measure and mark with a pen or pencil and use a straight edge to cut with the box cutter.

Once I have made the two passes and am to the adhesive backing, I stand it up and bend the foam back and cut down the crease that it creates.

Now I have this strip and I use a ruler to measure off 1 3/4" sections.

Cut them apart with the box cutter and a straight edge.
You should have 5 little blocks from one strip, and then a little bit of extra. You can save that extra for a smaller piece of foam, permanently mount an unmounted stamp you use all the time, or cut a piece of Fun Foam to the same size and make your own shadow stamp!

Then you need the HOOK side of the Velcro. It's the plastic side, not the fuzzy side. Cut that into 1 3/4" strips.

You will need to remove the backing sheet to reveal the adhesive.

Center your Hook onto your foam block.

Then slap your blending foam on and you are set!
These are very sturdy, and hold the foam like nobody's business. I keep one foam blender for each color of Distress Ink I own. I use it till it falls apart and then I toss it. Yes, you can switch the foam every time you need to change colors, but it's not long before that fuzzy backing on the foam is worn out and warped and I found I had to throw my blending foam out before I had used it up. I use my Distress Inks a lot, so I also got a little annoyed every time I had to change the foam out. This just worked out very well for me.
So, on to the economical part. If you were to buy 30 Ink blending tools that come with 2 blending foams, they are $4.99 each. Thirty of them would total $149.70
This crazy dense foam I have costs $14.95 a sheet and makes 30 blocks. The box of Velcro was $8.88 and 3 packs of blending foams (10 each) are $14.97 (but to be fair, you will have 60 blending foams if you buy 30 tools...so we will make that $29.94.....for a grand total of $53.77. That is a savings of $95.93!
(I was going to give you the totals and tell you to do the math, but I couldn't help myself!)
If you still don't have a clue what I'm talking about, stop by and I'll show you and you can decide if it's something that will work for you.
For those of you that are big Distress Ink fans like me....here are a few links to Ranger's free printable color charts. They are wonderful to have on hand when you are trying to match colors!
Distress Ink Color Chart
Distress Ink Color Chart
Distress Stain Color Chart (this one is for 11x17 paper)
There are a whole lot more charts HERE if you want to check them out.
Clear Stamp Storage
This is in no way my own idea, I got it from Jennifer McGuire...she has a video on YouTube HERE. But I love the way it works. Easy to see, easy to find an easy to store. I was able to find the cd/dvd binder sheets at a really good price and wanted to pass the deal and the idea on to you.

Limited quantity available. Once these are gone, they are gone.
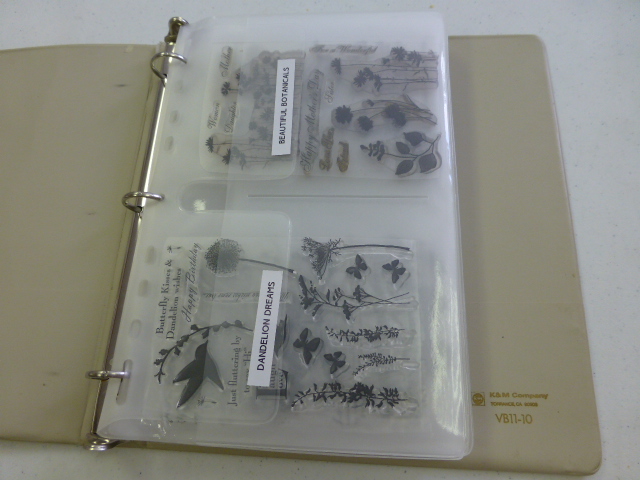
These fit the Skipping Stones stamp sets just perfectly, along with some of the sets from Hero Arts, Heartfelt Creations, and My Mind's Eye. The pockets are 5"x7".
Someone suggested this would be a great way to store embossing folders, too!!
Ok folks, that's all I have for now. I hope you all have a wonderful weekend and maybe get a chance to get out and see some of the beautiful fall colors we have out there!
0 comments:
Post a Comment